gamemaker 3d how to reduce draw calls
In this tutorial I'll teach you how to get the two.5D perspective in GameMaker:Studio!
patreon.com/diest64
Prologue:
I just want to mention a few things before we get started here. This tutorial is NOT aimed towards absolute beginners. Throughout this tutorial I'm going to presume you have a basic understanding of how GameMaker:Studio works, and that y'all likewise have some understanding of GML (gamemaker's language.) Even if you are a beginner, it will probably exist alright to nonetheless read through and just google things you lot don't empathize.
If you see anything wrong, or have any issues please don't hesitate to tell me!
If y'all readers enjoy my tutorials and would similar more, delight consider signing up for my Patreon. It would mean the world to me and I would be able to provide even more tutorials and you get some other slap-up rewards.
You can also download this project from my patreon.
patreon.com/diest64
Setting Upwards:
Start a new projection. Before we start getting into the 3D stuff, we need to practice some important setting up earlier we can go things to work.
Camera:
Become read my camera tutorial. This tutorial uses my pixel perfect photographic camera which nosotros volition be editing slightly later on.
- Pixel Perfect Camera Tutorial
Platformer:
Make a simple platformer. I volition not be covering how to practice this since there are millions of platformer tutorials out at that place. How our motility/collision works doesn't actually matter in the telescopic of this tutorial.
I recommend checking out Heartbeast's tutorial:
- Perfect Platformer in 15min!
All you need for my tutorial is unproblematic movement and standoff.
Lets Go Started:
At this bespeak you should have a pixel perfect photographic camera and simple platformer move/collision.
Now we're fix to start getting 3D into our game.
Editing Camera:
Beginning thing yous have to do is prepare the depth of your photographic camera to some actually loftier number. This has to do with how GameMaker draws things with 2D/3D, so for things to work correctly make sure the camera has a college depth than anything that is existence draw to the screen. I fix mine to 999.
From my pixel perfect camera tutorial, y'all should have a InitGame() script. Open that up and lets change it slightly every bit shown below:
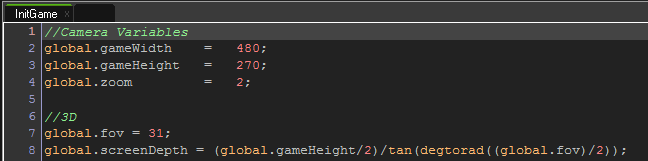
Here we're calculation the global 3D variables we need for our 3D camera. global.fov is our field of view and global.screenDepth is our screen depth.
At present in your actual camera object put another lawmaking action in the Create Event and write this in:
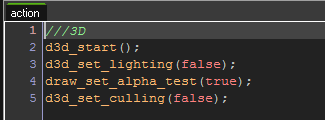
Here nosotros are just telling GameMaker to first 3D rendering with d3d_start(). Bank check out the documentation for each function subsequently that which explains what they practise manner better than I ever could.
tip:
middle mouse click on a function and information technology'll open the documentation to that function's page
Now add a Draw Event and write the code below in:
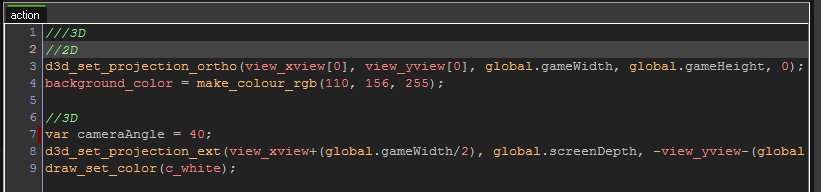
Generally I'thou against re-create/pasting code but line 8 is crazy long and wouldn't fit in a screenshot so just copy paste information technology:
d3d_set_projection_ext(view_xview+(global.gameWidth/2), global.screenDepth, -view_yview-(global.gameHeight/ii-cameraAngle), view_xview+(global.gameWidth/2), 0, -view_yview-(global.gameHeight/2+cameraAngle), 0, 0, 1, global.fov, view_wview/view_hview, ane, 1000);
At present let me explain what we're doing here.
We are basically setting up two different cameras which GameMaker calls Projections. We have a 2D projection, and 3D project. I've labeled which is which using comments.
2D:
If you demand to, for example, draw a 2D groundwork, or annihilation that isn't in our 3D space, then you tin do it here. Alternatively, you can create a separate object and draw something in 2d, but you'd need to set your projection to orthographic, draw in second, then set up it back to 3D project. If you lot decide to take this route, I recommend creating scripts for each projection change. As you can see instead of drawing a 2D paradigm, I just gear up a color for the groundwork.
3D:
The cameraAngle variable here controls the angle our camera points at. I wanted the camera to signal slightly downward at our player rather than a direct side view. Feel free to modify this to any you desire. 0 would be a straight side view and anything below 0 would indicate upwards.
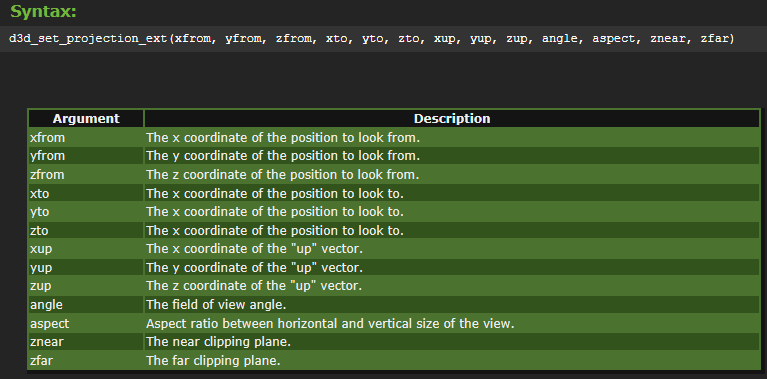
Line 8 is setting our projection to 3D and aligning our 3D project with our 2d projection. Now I think the rest of the arguments tin be explained by looking at the d3d_set_projection_ext documentation page so here is a screenshot of it:
Drawing Levels In 3D:
Now that nosotros've set up our camera, we demand to actually draw our 3D objects.
Open up whatever your floor/collision object is and create a Describe Effect. In the Draw Event write this lawmaking:
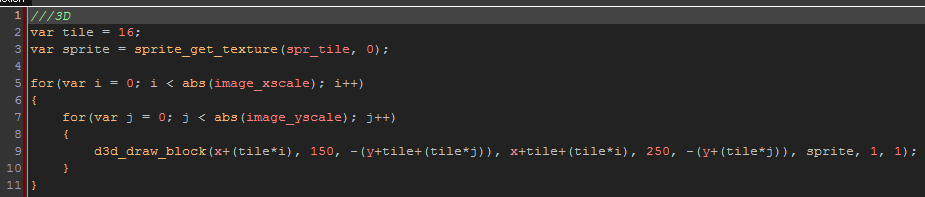
Here we're cartoon one 3D block for every tile broad/loftier our object is. Arrange the tile and sprite variables to your needs. The tile variable is the size of each tile, for me it's 16x16.
Annotation: If you want your 3D objects to appear closer/further from the camera, adjust the y argument when cartoon in 3D.
Now open up up your room editor and identify tiles effectually and drag their width/height to brand a simple level.
Hither is what mine looks similar:

Now if nosotros run our game everything should exist working correctly and we tin can encounter our 2D level turned into a 3D level.

Drawing 2D Sprites in 3D:
At present the terminal thing we have to practice is draw our second sprites in a 3D space.
Open your actor object and add a Draw Issue. Add this piece of code (it's besides pretty long so but copy/paste it):
d3d_draw_wall(x-(sprite_width/two*facing), 200, -y+(sprite_height/2), 10+(sprite_width/2*facing), 200,-y-(sprite_height/2),sprite_get_texture(sprite_index,image_index),1,1);
Here we are cartoon what GameMaker calls a wall. It'due south basically a plane or square in 3D space. So we're drawing this wall and setting its texture to any is currently the sprite_index and image_index of our object.
NOTE: I have a variable in there named "facing" that stores what direction the sprite is facing. 1 = right, -ane = left. Modify this to whatsoever variable yous're using to go on rail of that, or just delete it altogether if y'all aren't tracking that information.
Now run your game and you should have this:
Finished!
That'southward it! Y'all now have successfully created a 2.5D game using GameMaker:Studio. Let me know if y'all have any questions!
please consider joining my Patreon equally it would the globe to me and I'd exist able to write up even more tutorials, PLUS you'll get some other dandy rewards.
Yous tin can download this projection file from my patreon aswell!
patreon.com/diest64
Additional info:
Loading 3D models:
If you want to load in 3D models, there is a great script/tutorial made past someone on the GMC forums. Bank check information technology out here:
http://gmc.yoyogames.com/index.php?showtopic=609138
Source: https://michaelvandiest.tumblr.com/post/155962884315/25d-gamemaker-tutorial
Yorum Gönder for "gamemaker 3d how to reduce draw calls"